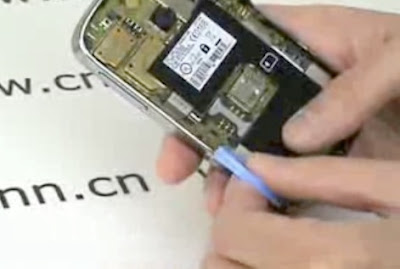
1. After removing the battery cover and battery, use the T5 torque driver to remove the 6 torque screws.
2. Lift out the midplate.
3. Carefully detach the cable from the connector, making sure not to damage the pins or any other electronic parts.
4. Lift up the motherboard(1), then insert the tool under the motherboard(2) to separate the adhesive from the screen. Remove the motherboard from the body(3).
5. Push gently on the bottom of the screen to remove it from the original frame.
6. Push gently on the bottom on the keyboard to remove it from the original frame.
7. Slide the keyboard into your custom-painted frame, ensuring the shown tabs slide into the keyboard. Press down on the bottom of the keyboard to lock it to the frame.
8. Slide the screen into the frame top first, ensure the tabs on the top line up correctly and bottom of the screen is fully secured. This may be a tight fit, and require a little extra effort to secure in place.
9. Replace the motherboard, starting with the USB port side. Use caution when inserting the motherboard, as the tab at the top is very fragile.
10. Reattach the connector by pressing gently on it.
11. Replace the midplate, placing the top in first
12. Replace the 6 T5 torque screws removed in the first step, then replace the battery and its cover. Then press firmly on the bottom to ensure it latches.
Source : www.colorwarepc.com
Download Manual Book
skip to main |
skip to sidebar
^
You can free Download Manual Book , User Guide , User Manual for BlackBerry - iPhone - LG - Motorola - Nokia - Samsung - Sony Ericsson
categorias
Main Menu
Black Berry Storm
archive
-
▼
2009
(85)
-
▼
July
(85)
- LG KE770 WAP ,MMS and IMAP E-Mail Service Setup Guide
- DB-800 Daughterboard for MOTM-800 User Guide
- Sony Ericsson P1i Review
- Power of one Sony Ericsson P1i pdf
- D-Client User’s Guide
- Sony Ericsson C902: An Outstanding Device With Uni...
- Verizon Brings Samsung Omnia i910 with Windows Mobile
- Samsung M8800 Pixon vs Nokia 6600 Slide: Amazing c...
- SAMSUNG OMNIA Upgrade User Manual (Windows XP)
- Samsung Omnia(TM) Becomes First DivX Certified(R) ...
- Samsung Omnia Navigation Configuration Guide
- Nokia 6260 Slider with High-End Photo Camera
- Nokia N97 Full Specs Unveiled
- Nokia E71x Getting Start User Guide
- Nokia 1661 Fact Sheets
- Nokia 1661/1662 User Guide
- Nokia VPN Solutions
- Motorola V3-Razr Repair Manual Book
- Motorola Razr v3 Black Manual Book
- Motorola RAZR User Guide
- Motorola RIZR z3 User Manual
- Motorola KRZR talk Manual Book
- Music Frequently Asked Questions for the Motorola ...
- Music Frequently Asked Questions for the Motorola ...
- Motorola KRZRT K1m User Guide
- Motorola KRZR K1m User Guide
- Motorola KRZR K1 User Manual
- Motorola W220 User Manual
- Motorola V195 How To Guide
- Motorola E1 ROKR User Guide
- Motorola W510 User Guide
- 7 New Entry-Level Motorola Mobile Phones reviews
- Motorola W206/W213 review
- Motorola RAZR V9m Programming Steps
- Special Instructions for your MOTOROLA RAZR V3
- Motorola RAZR v3i User Manual
- Motorola Razr V3x Personalization Guide (MoGu V3xP...
- MOTOROLA RAZR V3 - BLACK Features and Specs
- Motorola Phone Tools User Guide
- Phone Tips
- iPhone Tips - Transferring Your Contacts to iPhone 3G
- Cut & Paste Gets Friendly with the iPhone 3G
- Configuring iPhone / iPod Touch for MUSC’s Exchang...
- SyncJe for iPhone User Manual
- The iPhone: A Consumer Perspective
- iPhone and iPod touch Enterprise Deployment Guide
- Macworld iPhone Superguide
- GyPSii launches iPhone platform
- iPhone User’s Guide
- iPhone vs. BlackBerry: Which Do Consumers Love Most?
- iPhone™ and iPod®touch Programming: Handling Touch...
- Why Apple Can’t Stop iPhone Hackers
- iPhone Optimization
- Impact of the Apple iPhone on the Mobile Phone Ind...
- Fonts From Mac OS X Included With iPhone
- Setting up iPhone for Hastings Email
- Setting up Email Accounts on Your iPhone
- VISTO MOBILE for the Apple iPhone
- View Maps and Images on the iPhone and iTouch
- iPort™ Showcases Apple iPhone™ Adaptability & Vide...
- NCMail: iPhone 2.0 Setup Guide
- Why the iPhone 3G Is a King and a Beggar at the Sa...
- Oracle Business Indicators for the Apple iPhone
- Apple Reinvents the Phone with iPhone
- iPhone in Enterprise
- Trying to judge the iPhone’s effect
- Apple Introduces the New iPhone 3G
- Use FUSE to accelerate iPhone Web Development
- MPG User Manual (1.0) for iPhone/iPod Touch
- Apple in mobile Manual
- BlackBerry Bold 9000 Smartphone - Getting Started ...
- Blackberry Bold Versus Blackberry Storm: Compariso...
- BlackBerry 8700g Wireless Handheld Getting Start G...
- OtterBox Defender Series for BlackBerry
- Poynt for BlackBerry Smartphones Installation & Us...
- Poynt for BlackBerry Smartphones Installation & Us...
- BlackBerry Curve 8310 Smartphone Safety and Produc...
- BlackBerry Curve 8310 Smartphone Getting Started G...
- BlackBerry Branding Guidelines
- BlackBerry Bold Disassembly and Assembly Instructi...
- Contact
- Provacy Policy
- About
- BlackBerry 4.5 Software Update Installation Instru...
- BlackBerry Bold 9000 Review
-
▼
July
(85)
 | blogger addicted por UsuárioCompulsivo original Washed Denim por Darren Delaye |
0 comments: